|
Mars | |
| HOME Best Lunar Planets Deepsky Misc Equipment Techniques Links |
| Venus Mars Jupiter Saturn |
| Along with Venus, Mars - the so-called Red Planet - is one of our nearest neighbours among the other planets of the solar system. Particularly when at opposition it approaches Earth closer than usual and can appear very bright in the sky. I got my first opportunity to image Mars during the apparition of 2005. I used my ToUCam webcam and Europa 250 telescope to capture some pictures, which are displayed on this page. Some images are displayed in combination with a simulation by T. Ikemura of Japan, which shows the expected view of the planet at half-hourly intervals. The simulations can be found at http://www.kk-system.co.jp/Alpo/MS2005/MSmenu.htm. |
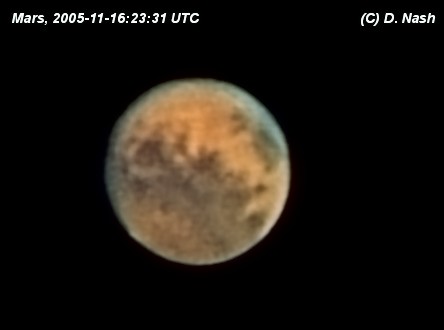
| 16 November 2005, 23:31 UTC | |
|
On the night of 16 November the atmospheric seeing was the best I can remember. I captured many mars AVIs and here is the first result I processed. It's an IR-RGB composite. |
|
The IR was captured using my home-made IR-pass filter. I
stacked 450 out of 2319 frames captured. Settings: 10fps,shutter 1/50, gain 78%, gamma 0. Camera in B&W mode.
The RGB was captured using a Baader UV-IR blocker, I stacked 300 out of 1066 frames captured. Settings: 10fps, shutter 1/25, gain 75%, gamma 0. Colour balance was red: 28, Blue: 24 |
|
23:11 UTC | |
|
Another image from the same night - This one is a composite of a standard RGB with IR blocker (500 frames stacked out of 3000) and IR luminance (600 frames stacked out of 3000). |
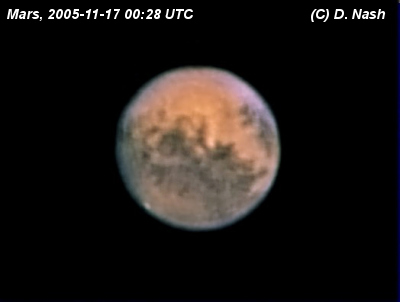
00:28 UTC | |
|
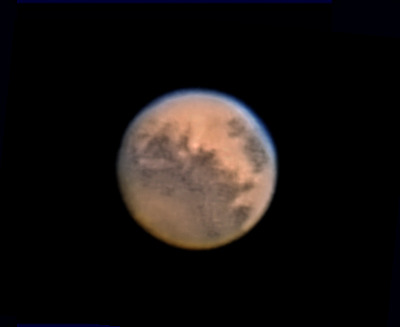
The next, and probably the best, image from the night of 16-17 November is also an RGB (with UV-IR blocker) and IR luminance.
The RGB was 400 out of 1400 frames, and the IR was 500 out of 3120 frames. |
|
In contrast to my previous picture from that occasion, when I tried out some shorter exposures and higher gain settings, for these images I used 1/33 exposure for both AVIs and 43% (RGB) and 81% (IR) gain.
Both AVIs were stacked in K3CCDTools, with wavelets applied in Registax. Then I lightly sharpened the IR and layered it on the RGB using The Gimp. Next I did some noise removal using Noiseware Community Edition. That may well have been the important step. It allowed me to go back to The Gimp and sharpen further. In fact I selectively sharpened, so as not to bring back any noise in the red areas of the planet. |
|
| to top | home |
| 13 November, 2005 | |
|
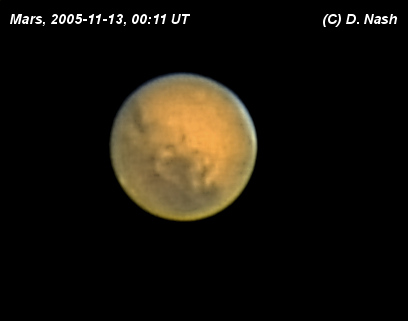
After being clouded out for much of October 2005, I finally managed an image on 13 November. I used my ToUcam Pro with Baader UV-IR filter on the Orion Optics 250mm f/4.8 Newtonian. |
|
For this image I captured 3 AVIs of 3000 frames each, at 15fps in optimised colour non-raw mode. Only the first one had good enough seeing/focus.
I stacked the best 500 frames out of the 3000, using K3CCDTools, then applied wavelets in Registax and processed further in PixInsight LE and The Gimp. |
|
| to top | home |
2 October, 2005
|
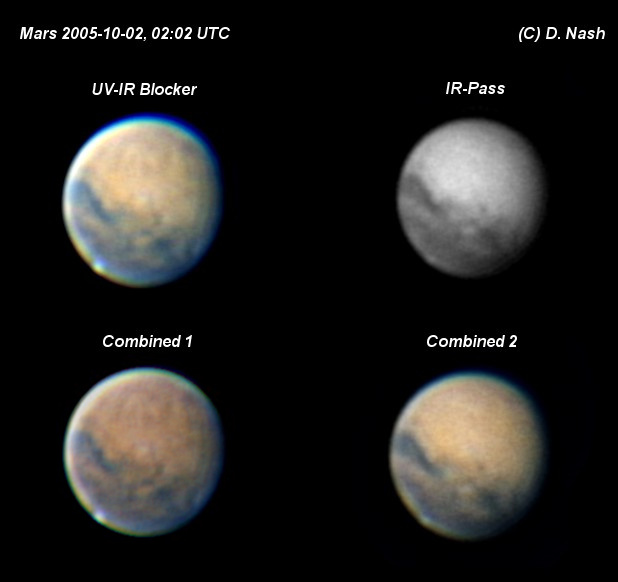
On this occasion I used my home-made Infra-red pass filter. This is a filter tha only allows infra-red light to pass. Although we can't see IR light with our eyes, the sensor in the webcam is very sensitive to it (once the webcam's IR blocker has been removed) and on certain subjects, including Mars, an IR frame can act as a nice luminance (brightness) layer. I also captured a standard RGB colour image (captured with a UV and IR blocking filter), and combined the two using The Gimp. |
|
I spent some time trying combinations of merging different versions of these images, and along with the RGB and the IR I present two combinations here.
The IR-pass filter is simply made from two layers of exposed film, mounted in a standard colour filter holder - I removed the colour filter and replaced it with two disks of film. The images are created from 700 frames stacked out of 2500 captured in RGB, and 400 frames of IR luminance layered on top. Stacking was done using Registax and processing including luminance layering was done in The Gimp. This image shows the Mare Sirenum and Solis Lacus features well, and possibly a cloud in the centre. There are some details in the upper half of the planet that are not visible on the IR image. But the RGB image has the bright limb that is not present in the IR. There are some light spots on the RGB and combined 1 images that may be volcanoes |
|
| to top | home |
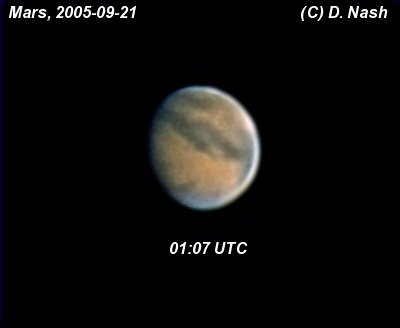
21 September, 2005
|
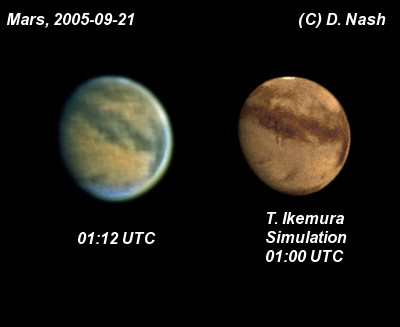
On my second session of imaging the "red planet" I again used my Televue 5x Powermate on the Europa 250 telescope, but this time I added an extension tube between the lens and the camera. This gives additional magnification.
I used the TouCam pro in non-raw colour optimised mode, with the Baader UV-IR blocking filter. The camera settings were: Saturation : 100% Gamma : 0% WhiteBalance : manual WhiteBalRed : 25% WhiteBalBlue : 27% FPS : 10 Gain : 62% |
| The K3CCDTools exposure meter was around 150. I captured 1150 frames then had to stop because of cloud. I stacked the 300 best frames in Registax 3 (using the Gradient quality estimation method, and LRGB stacking), applied wavelets in Registax, then saved the image in 16-bit TIF format and post-processed in PixInsight LE (where I applied levels, A Trous wavelets and curves). Final tweaks and a slight increase in size was done in The Gimp. | |
|
A few minutes earlier I had captured an AVI unhindered by cloud. This one was 1800 frames, with similar settings to the one above. In this case I stacked the best 400 frames and processed using the same tools. |
| It is interesting to compare the difference - fewer frames in the stack normally means more noise in the final image. But picking fewer frames means you will stack only the best frames, leading to better resolution of details. In practice it's a trade-off, as with many things. | |
| to top | home |
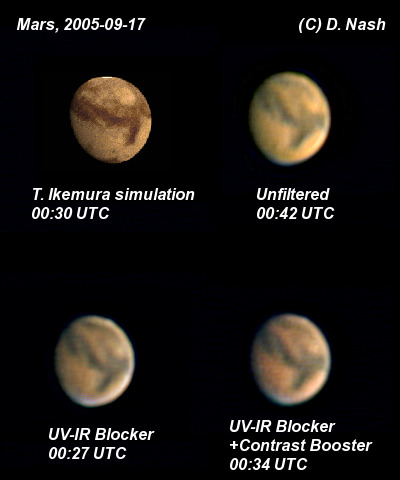
17 September, 2005
|
I made my first images of Mars using a 5x Powermate image amplifier lens, on my Europa 250 telescope. This combination gives me a focal length of 6000mm, a ratio of f/24.
I tried three combinations of filter - first I attached a Baader UV-IR blocker filter; next I added a Baader contrast-booster; and finally removed all filters to image directly. As you can see from the images the one with just the UV-IR blocker is slightly better than the one with the contrast booster and the unfiltered one. |
| The camera was in non-raw colour optimised mode. The settings were: Gain around 30%, shutter 1/33, gamma 0, brightness 50%, saturation 100% and white balance auto. I captured 1200 frames for each image, of which I aligned and stacked 300 in Registax 3. Registax wavelets were applied. Then the images were imported to PixInsight LE for "A Trous" wavelet processing and colour adjustment. Finally the image was tweaked in The Gimp. | |
| to top | home |
|
|
|
 |
|
| All text and images copyright and may not be used without permission |
|