|
Which Webcam?
There are many different webcams on the market at the moment. They have been one of the successes of the last few years and work very well for the purpose for which they were designed.
However, they were not designed for astronomical imaging, and only a minority of webcams available today are suitable for our purposes.
-
In general, the important thing to look out for is the image sensor type. They come in two flavours: CMOS and CCD. This is similar to conventional digital cameras. For astronomical imaging a CMOS sensor is generally just not up to the job. Sometimes, reasonable lunar images are possible with this type of sensor. In general though, when acquiring a webcam, you should opt for one with a CCD sensor if you intend to use it for astronomical imaging.
-
Over the years there have been various webcams with CCD image sensor chips, and experience has shown which have given the best results. The older Philips Vesta Pro series of cameras was popular, and recently the slightly better ToUCam Pro and Pro II cameras (models PCVC730K and PCVC740K) have superceded them. Philips is not the only manufacturer of webcams though, and the Logitech Quickcam pro cameras (Quickcam Pro 3000 and 4000) have been found to be equal to the Philips models for Lunar and Planetary imaging.
Attaching to the telescope
As supplied, a webcam comes with a small wide-angle lens that again is ideal for the camera's original purpose but is less than optimal for astronomical purposes. The best results come from removing this lens and attaching the webcam to a telescope, which effectively becomes a very large telefocal lens on the camera. There are several options:
-
Prime focus (Cassegrain focus on a Schmitt Cassegrain type of telescope). This is the simplest method and involves attaching the camera, without its original lens, to the telescope's focusser in place of an eyepiece. Adapters are available that screw into the original webcam's lens holder and slip into a 1.25" focusser just like an eyepiece. Alternatively a "T" adapter can be attached to the camera instead for those focussers that have a "T" thread to accept a camera.
-
Barlow projection. This is similar to the direct "prime focus" method described above but with the insertion of a Barlow lens between the webcam and the telescope, just as if you were using a Barlow lens with an eyepiece. This method will increase the magnification as one might expect, just as it would with an eyepiece.
-
Eyepiece projection. In this mode an eyepiece is inserted into the telescope's focusser and the camera, again without its lens, is attached using a special adapter to "look through" the lens. This method enables high magnifications to be achieved but at the expense of "more glass" in the optical path. Furthermore a special eyepiece projection adapter is usually necessary in addition to the usual focusser adapter required to connect the webcam to the telescope.
It is worth pointing out that the ease with which the standard lens can be removed varies between webcam types. In particular, the lenses on the Philips models can simply be unscrewed all the way out and thereby removed, whereas to remove the lens from a Logitech QuickCam Pro (and perhaps others), the camera's case must be opened (naturally invalidating the warranty).
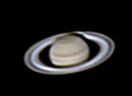
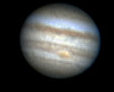
Be aware that removing the lens on the ToUCam will remove the Infra-red blocking filter, thereby affecting the colours recorded There is some discussion about whether this is a big problem, and whether it also affects focus too (since IR will be focussed at a different point than the visible light), and some people like to use an additional IR-blocker screwed into the adapter. Judge for yourself, since all my 2004 planetary images were captured with NO filter, and those of 2005 WITH a filter.
|